Organizing your Swift classes
I’ve always used Xcode annotations to organize my code and improve its readability. I finally ended up with a pattern I use in almost every class, which allows me to work more efficiently.
Readability
I try to have a good organization in all my classes, it helps me quickly find what I’m searching for.
Whatever the pattern you choose, what is important is to always reuse the same organization in your project. You can then open any file and go directly to the section you are interested in because you know where it is.
Pattern
Having had a look at the WWDC 2015 sample code about advanced collection view, I took out a pattern for annotations in classes (even if I know, nobody likes Apple sample codes).
This pattern is mostly valid for view controllers and views, which are the most common classes in a regular iOS project. But you can still reuse parts of it in other classes.
- Types: contains enumerations,
- Properties: all properties (IBOutlet, let, var, etc.),
- View Life Cycle: all viewDid… methods,
- Lifetime: init and deinit methods,
- Layout: layoutSubviews… methods,
- Setup: view and data initialization,
- Actions: actions done by the user (IBAction, UIGestureRecognizer, etc.),
- UIStoryboardSegue Handling: prepareForSegue… methods,
- Notifications: notifications methods,
- Convenience: interface update, all convenience methods (e.g. cellForType),
- UI…Delegate: all delegate methods.
Then inside each annotation, I write my methods in the order they are called, as recommended by Uncle Bob in his book Clean Code.
Swift extensions
Swift has brought the possibility of using Swift extensions to organize the code into smaller bricks. I totally agree to use this method for protocol conformance:
class ViewController: UIViewController {
    // MARK: - Setup

    // Put all the setup methods here

    // MARK: - Actions

    // Put all the actions methods here
}

// MARK: UITableViewDelegate
extension ViewController: UITableViewDelegate { }
But you can go even further, as Natasha The Robot suggested it, by using Swift extensions to group your methods:
class ViewController: UIViewController { }

// MARK: - Setupextension ViewController {
    // Put all the setup methods here
}

// MARK: - Actionsextension ViewController {
    // Put all the actions methods here
}

// MARK: UITableViewDelegateextension ViewController: UITableViewDelegate { }
The downside of using this method is that you can’t override a method in an extension yet, which is very useful to mock data in your unit tests.
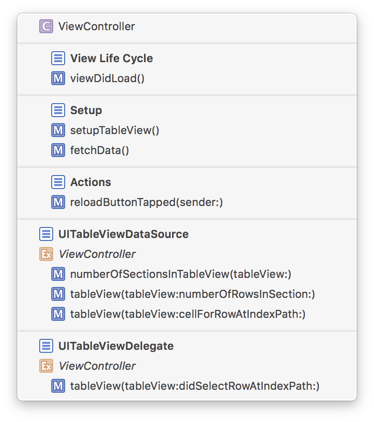
However from an organizational point of view, that’s fine, just don’t forget to add an annotation for each extension, otherwise, you don’t know what each section is about. And most of all, you don’t take benefit of the biggest advantage of using annotations: improve the readability of the Xcode source navigator (shortcut: Ctrl + 6).

On a personal note, I also like the fact of having a green color as a separator in my class, it’s visually cleaner (I’m totally aware that this is a stupid argument for colorblind people).
Final thoughts
Organizing your classes with annotations allows you to be super effective when browsing your files, especially when working in a team, where you have to deal with your colleague’s code and way of doing things.
Start by defining a pattern your team agrees on and try to apply it, you’ll see how easier it is to read your colleagues’ code!